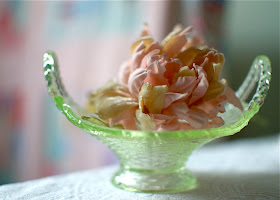
Shallow : ISO 200 | Aperture f/1.8 | Shutter 1/25
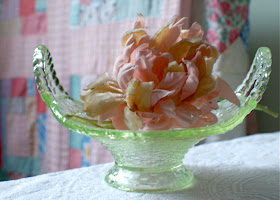
Long : ISO 200 | Aperture f/10 | Shutter 1
Hi Everyone -
As previously mentioned, I'm sharing some of the things we're learning in my digital photography course. My goal is to focus on the bottom line, so we can remember these steps in the field. To recap, there are four elements to consider when taking a photo, which I call the Power of How -
Step 1 : ISO - How is your light?
Step 2 : Aperture - How is the focus?
Step 3 : Shutter Speed - How long is light allowed into the camera?
Step 4 : Light Meter - How is the exposure to be adjusted?
Last time, we learned about Step 1 : Setting the ISO and today we'll address aperture -
Step 2 : Aperture - How is the focus?
Do you want a shallow or long depth of field?
Aperture refers to controlling the light that passes through the lens and is measured in f-stops. A lens set to its maximum aperture allows the most light to pass through and is considered to be wide open. One that is set to a smaller aperture limits the light and is considered to be stopped-down. Here are some guidelines -
Shallow depth of field = less area in focus, softness.
Limited focus = low number.
- f /1.4
- f /2
- f /2.8
- f /4
- f /5.6
Expanded focus = high number.
- f /8
- f /11
- f /16
- f /22
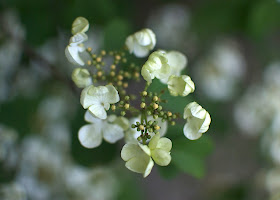
Shallow : ISO 200 | Aperture f/1.8 | Shutter 1/800
Notice the clarity in the background.
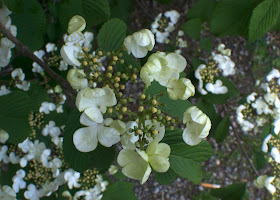
Long : ISO 200 | Aperture f/22 | Shutter 1/5
Notice the focus on the word 'create' and how everything else gets softer as you reach the edges of the photo.

Shallow : ISO 800 | Aperture f/1.8 | Shutter 1/1250
Notice the overall clarity and your ability to read the text.

Long : ISO 800 | Aperture f/22 | Shutter 1/8
Notice the softness of the white background.
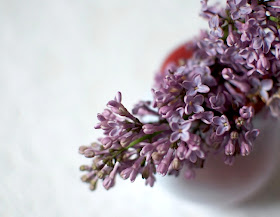
Shallow : ISO 400 | Aperture f/1.8 | Shutter 1/320
Notice the detail in the white background, which is actually lace.
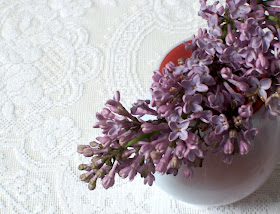
Long : ISO 400 | Aperture f/22 | Shutter .4
At this point, you can turn your dial to 'A' (aperture) on your dslr and adjust the depth of field up or down to get the different effects. Your camera will automatically adjust the shutter speed. On your point & shoot, try switching to the flower icon for a more shallow depth of field.

ISO 200 | Aperture f/5.6 | Shutter 1/1600
Next time, we'll cover choosing your shutter speed or how long light is allowed into your camera, which will blur or stop motion. Depending on the subject matter you're photographing, you might want to select this first, but more on that next week. Let me know if you have any questions. I'll try to answer them. If I've gotten something wrong, let me know and I'll correct it.
xo, Cindy
Source : Keisha Scarville

WOW Cindy your photos are beautiful!!
ReplyDeleteso cool cindy, i'll have to take notes here...
ReplyDeleteOhh I love messing with aperature! These are great examples and your pencil photo is wonderful!!
ReplyDeletecindy...i love you even more...you are totally helping my camera phobia---for some reason jim can never explainthis to me (something about the numbers..uh...) but you've explained this so well...!
ReplyDeleteOh my goodness! You are indeed a god-send! Thank you so much for sharing all these wonderful tips!
ReplyDeleteGreat little photography lesson!
ReplyDeleteThat was a great tutorial! I am just learning to use my D60 but haven't signed up for a course yet. Apeture is by far my favorite setting to play with. Your photos illustrate the difference in settings very well. Great shots! Have you been to www.thepioneerwoman.com to see her photography tutorials? She even offers some photoshop help and free actions.
ReplyDeletehttp://joyfulmara.blogspot.com/
we can do it! it's just a little gadget ;).
ReplyDeletepersonally, i love aperture and shallow depths of field.
hi mara, i've been to the pioneer women site and i'm not ready for her tutorials just yet ;). i will visit you.
Oh, I am dying to get a DSLR of my own! I have out grown my pint and shoot, but I am still trying to convince my husband that it's worth the investment! Pray he'll see it my way soon! Thanks for the lesson, I'm book marking it for future reference!
ReplyDeleteI'm having a giveaway on my blog (this will be a new weekly thing!), so stop by and enter!
these are great examples and great photos! so much fun!
ReplyDeleteCindy, I can't thank you enough for your easy-to-understand lessons that are finally helping all of the technical terms stick in my mind! You have helped reduce the number of photos I take to get one good shot from 100 to 20!
ReplyDeleteYour pictures are so beautiful. I'm really drawn to the softness and gentleness of the ones with low aperture.
Love the photos, as usual. Your examples are wonderful. Thanks!
ReplyDeleteHey Cindy, I looked at your sidebar and saw all the musical groups/soloists listed and thought you might like a new blog I discovered:
ReplyDeletehttp://ramblingonat.blogspot.com/
He's just starting, but it's pretty good.
What fabulous tips. My photo skills need some work and this is the perfect tutorial.
ReplyDeleteThanks much
I love it thank you now I have to try !
ReplyDeleteBEAutiful shots... FUN learning... I LOVE the auto focus setting best... LOL!
ReplyDeleteENJOY!
Fifi
This is great! Thank you for sharing this!
ReplyDeleteI´ll be back to study this. Great examples. Thanks!!
ReplyDeleteThis is fantastic Cindy, I'm having one devil of a time with my new NikonD90. I am ordering the "Dummies" book on this camera, because the manual is killing me. I get so easily confused and all terminology is making my head spin. I will have to read your post a million times and take some notes down to get it.
ReplyDeleteThanks for the tutorial.
wonderful tutorial, cindy! now if only i had a new camera (my heart beats for a nikon d-60 but i won't let myself buy it yet). i tend to prefer the softer focus on most of these shots. so nice!
ReplyDeleteglad i can help! i think the perfect focus is probably somewhere in between, but closer to softer.
ReplyDeleteFantastic stuff - I just bought a new camera and am still discovering all the fancy things to do with it.. Oh, and I loved loved loved the flowers.
ReplyDeleteThese short summaries are exactly what I need! Thanks, Cindy, for sharing this very helpful information! Your pictures are great as usual...
ReplyDelete