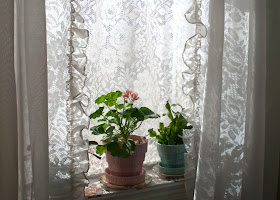
ISO 100 | Aperture f/5.6 | Shutter 1/320
Hi Everyone -
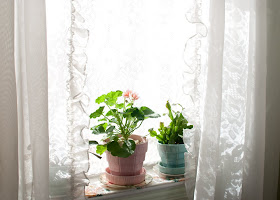
It is the big day in our digital lab. By learning about the light meter, we will know enough to turn the dial to 'M' (manual). The light meter measures the amount of light that is reflected on a given subject. While the top image seems just about right and is close to the actual lighting at the time, we've all had photos that are over-exposed or too bright. In the photo below, we're actually losing information in the bright white center area.

ISO 100 | Aperture f/5.6 | Shutter 1/60
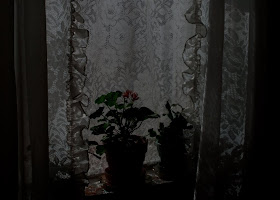
We've also had images that are under-exposed or too dark. See how we're losing information in the dark areas on the edges and shadows as they're black?

ISO 100 | Aperture f/5.6 | Shutter 1/2500
You might want your photo over/under-exposed, so it's not really about right and wrong. It's more about controlling the outcome. You can adjust exposure in your photo editor, but in these cases those efforts will be limited. It's best to try to take a photo that is properly exposed and make minor edits either way on your computer, if necessary.
In order to set the the correct exposure in Manual mode, you will need to adjust the light meter. Everyone has one in their camera whether it be a point & shoot (find it in function) or a dslr (find it in information display on the lcd or through the viewfinder). It looks like this -
+......................0......................-
over.............. perfect........... under
over.............. perfect........... under
If you want to shoot on Manual mode you will have to look at the light meter for just about every shot and adjust it up or down. For me, that's too time-consuming, especially when I'm with my family. I'm still figuring this out, but think I will be using the following settings since most of my photos are taken in normal daylight situations -
ISO : 100-200
Aperture Mode : Indoor shots. I'm most interested in setting my depth of field in still lifes and will allow the camera to choose the correct shutter speed. I always use a tripod, so I won't worry about blurring at slower speeds.
Shutter Mode : Outdoor shots. I'm most interested in getting a clear shot outdoors and want my shutter speed set to around 1/60th since I'd rather not take a tripod with me. The camera will automatically choose the aperture, but I'll play with it, too.
Exposure : For all modes on dslrs, there is additional feature that will allow you to adjust exposure in the information display on the lcd screen. It's in a little box.
I've prepared a summary of all the steps (below) and if you send an email to sckrik{at}verizon{dot}net, I'd be happy to send you a pdf to easily print and take with you. As always, let me know if you have any questions. If I've gotten anything wrong, let me know and I'll correct it.
xo, Cindy
Source : Keisha Scarville
__________________________________________
The Power of How
Simple Steps About Camera Controls
Step 1 : ISO - How is your light?
How does the light look in your environment?
Are you indoors/outdoors? Is it sunny or cloudy? Is it nighttime?
ISO is how the sensor in your camera responds to light. The higher speeds let in more light, but will sacrifice image quality resulting in grain or noise in the photo.
- 50 - 200 : best in bright light, outdoors, partly cloudy
- 400 - 800 : low light, late afternoon, heavy overcast, indoors
- 1600 - 3200 : very little light, night time, indoors
Do you want a shallow or long depth of field?
Aperture refers to controlling the light that passes through the lens and is measured in f-stops. A lens set to its maximum aperture allows the most light to pass through and is considered to be wide open. One that is set to a smaller aperture limits the light and is considered to be stopped-down.
Shallow depth of field = less area in focus, softness, low number.
- f /1.4
- f /2
- f /2.8
- f /4
- f /5.6
- f /8
- f /11
- f/13
- f /16
- f /22
Do you want to blur or freeze motion?
Shutter speed controls the length of time the camera's sensor is exposed to light passing through the lens and is represented in fractions of a second. A fast shutter will freeze motion while a slow one will blur it.
Blur motion = the lower the denominator the slower the shutter. You are more likely to capture camera shake using these settings, so a tripod is encouraged.
- 1
- 1/2
- 1/4
- 1/8
- 1/15
- 1/30
- 1/60
- 1/125
- 1/250
- 1/500
- 1/1000
- 1/2000+
The light meter measures the amount of light that is reflected on a given subject. In order to set the the correct exposure, you will need to adjust the light meter. It looks like this -
+......................0......................-
over.............. perfect........... under
over.............. perfect........... under
A function to adjust the exposure can also be found in the information display on the lcd of a dslr.

I loved this series of posts! I really appreciate the review post too; great for refreshers! Will there be a test now?? :)
ReplyDeleteCindy, THANK YOU so... much for sharing your experience of school with us! I especially enjoy it as I'm still trying to figure out my camera and to get better at photo taking. Beautiful shots and illustration of lighting.
ReplyDeleteHope your day is a picture perfect day! xoxo
thaaaaank you!
ReplyDeleteThank very much! I'd love the pdf. Molly acyder@gmail.com
ReplyDeleteI'm printing out this post right now! Thank you, dearest Cindy, you continue to be a beacon for us newbies to the digital photograph world :)
ReplyDeleteI'm so grateful for how you have turned technicalites into simple guidelines that I can actually remember when I'm shooting. From myself and my photos, thank you SO MUCH Cindy!
ReplyDeleteThanks Cindy!! Come check out my Giveaway today...you will like.
ReplyDeleteI love going to photo school with you! Thank you for sharing and for explaining so nicely.
ReplyDeleteYou just make everything so simple!
ReplyDeleteYou have no idea how helpful these short overviews have been to me! Thanks again, Cindy!!
ReplyDeletei can't wait to see what beauties you create now that you're armed with all of this knowledge!
ReplyDeleteThank you for the tips! I'm going to e-mail you for a PDF now.
ReplyDeletei'm so glad this is helpful. it's kind of tricky to explain. sending you the pdf, molly.
ReplyDeleteThat lighting is definitely different.
ReplyDeleteLOVE your sweet pea photos!
so great, thank you!
ReplyDeleteI'm really enjoying your photo series here. I am bookmarking for when I have time to do some tests.
ReplyDelete