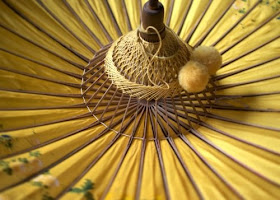
Spinning - Fast Shutter : ISO 400 | Aperture f/1.8 | Shutter 1/500
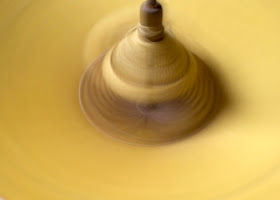
Spinning - Slow Shutter : ISO 400 | Aperture f/22 | Shutter 1/3
Hi Everyone -
We are on to shutter speed in our digital lab and almost ready to switch the dial to 'M' (manual), but not quite. To recap, here are the four elements to consider when taking a photo, which I call the Power of How -
Step 1 : ISO - How is your light?
Step 2 : Aperture - How is the focus?
Step 3 : Shutter Speed - How long is light allowed into the camera?
Step 4 : Light Meter - How is the exposure to be adjusted?
Shutter speed is important if you want to photograph action (sports) and in very low light situations (night). If you want to blur or freeze motion, setting the shutter speed will be your first priority vs. aperture so you can switch the steps.
Step 3 : Shutter Speed - How long is light allowed into the camera?
Do you want to blur or freeze motion?
Shutter speed controls the length of time the camera's sensor is exposed to light passing through the lens. A fast shutter will freeze motion while a slow one will blur it. It is represented in fractions of a second and will double as you increase/decrease the setting. Although these charts are in fractions, you might only see the denominator (bottom number) on your camera. Here are some guidelines -
Blur motion = the lower the bottom number the slower the shutter. You are more likely to capture camera shake using these settings, so a tripod is strongly encouraged.
- 1
- 1/2
- 1/4
- 1/8
- 1/15
- 1/30
- 1/60
- 1/125
- 1/250+

Falling - Fast Shutter : ISO 400 | Aperture f/1.8 | Shutter 1/800
Notice the blur of the pencils and the long depth of field from the aperture.

Falling - Slow Shutter : ISO 200 | Aperture f/22 | Shutter 1/10
Notice your ability to see a little bit of definition of each blade as the fan spins and the clarity of the text in the center.

Fast Shutter : ISO 400 | Aperture f/1.8 | Shutter 1/800
Notice the blur of the blades.
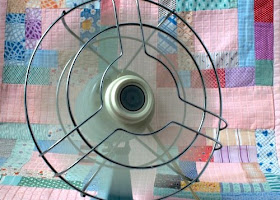
Slow Shutter : ISO 400 | Aperture f/22 | Shutter 1/6
Notice the overall clarity and the individual water droplets.
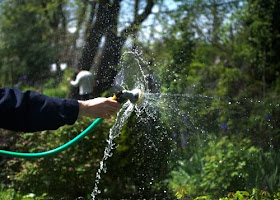
Fast Shutter : ISO 200 | Aperture f/1.8 | Shutter 1/2500
Notice the overall blur of the water spray.
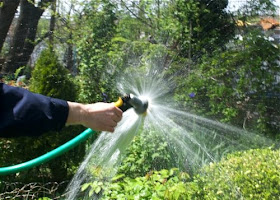
Slow Shutter : ISO 200 | Aperture f/13 | Shutter 1/20
At this point, you can turn your dial to 'S' (shutter) on your dslr and adjust the shutter speed up or down to get the different effects. Your camera will automatically choose the correct aperture as they go hand in hand. On your point & shoot, try switching to the runner or night icons for a faster shutter speed.
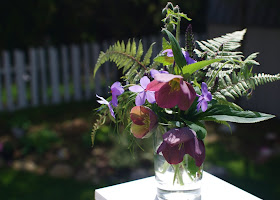
ISO 400 | Aperture f/5 | Shutter 1/400
Next time, we'll cover the light meter, which deals with adjusting the exposure. Although it is easy enough to do, this is the step that takes the most discipline. I've lost many photos to over or under exposures because I forgot to check and adjust the light meter. Ugh!
Let me know if you have any questions. I'll try to answer them. If I've gotten something wrong, let me know and I'll correct it.
xo, Cindy
Source : Keisha Scarville

WOW Cindy this is really neat! I'm going to have to come back here with my camera and see if I can follow along. Thanks. xoxo
ReplyDeleteCindy, this stuff is sooooo cool! I must be honest - I think its too complicated for me; I'm such a point and click girl, but your explanations are easy to follow and your examples are superb. Keep it up! I'm loving it!
ReplyDeleteWhen you break it down, it's not too complicated. One day, you'll just be ready, but it does take more work. I think I'll shoot somewhere between automatic and manual once I'm done with the class.
ReplyDeletei LOVE your photography posts...been playing around with james's SLR lately...sure does make a difference! {and you can visit anytime...i come from a long line of pushy new yorkers, so no worries there}!
ReplyDeleteYEAH! Another great lesson :)
ReplyDeleteok so i am going toprint all of these out--is that ok? you are so helpful---you should write a book cindy! for real!
ReplyDeletei am no expert - just copying the information i've received. i choked in class today when it was time to show our photos. i had to narrow them down from about 30 to 3 pronto. snappy decisions are not my forte ;).
ReplyDeleteyou can certainly print these instructions, but i'm going to compile all the guidelines together next week.
i LOVE your tutorials! i've missed the last one so i'll have to catch up, but it's so so interesting and enlightening!
ReplyDeletethanks for sharing them. :)
Very instructive! Thanks, Cindy!!
ReplyDeleteI've tried the umbrella trick a couple of weeks ago. It didn't work, partly because of the umbrella, which was plain ugly, but more importantly because I didn't do it right... Too lazy to get the tripod out, I was holding both the camera and the umbrella... no way I could focus on shutter speed! ;)
I'm looking forward to the exposure part, as that's something I'm really struggling with still!
Great explanations! They are really easy to follow! Thanks for the sweet comments on my blog. I know things are going to get better, and actually they already seem so since we have decided to be proactive in this process! We are very fortunate!
ReplyDelete-kelly
WONDERFUL tutorial, Cindy! I love the side-by-side comparisons. Tres fabu are you!
ReplyDeleteGreat post, Cindy!
ReplyDeleteThose pictures are such great examples for illustrating this concept.
ReplyDeletethank you soo soo much. I'll be sending q's s I practice...
ReplyDeletedallas
http://dillydallas.blogspot.com
Cindy, If you see a lot of hits from CA, you'll know that's me stalking this post and trying out all of your tips. Though, I'll have to do it on my SLR {as in film} still saving for my DSLR. :) Can't wait...thanks so much. Love the pencils and parasols.
ReplyDeleteCindy,
ReplyDeleteI have so little time right now but I just want to say HELLO!
And I like your photos ofcourse!
these posts of yours are so great ... i've been bookmarking them all. thanks for taking the time to share!
ReplyDeleteThese images are incredible, Cindy! What a pro you are :)
ReplyDeleteLOVE these motion shots... especially the water from the hose... FUN!
ReplyDeleteWonderful information! Love the visual aides!
ReplyDeleteWhat an amazing tutorial!
ReplyDeleteI will be directing a few people your way who are interested in learning about Photography!
Our dark room will be finished next year(2010 project-or so my DH says:-)
Thanks for always leaving the kindest comments on my site!
Your work is amazing...I am always left wanting to create better pictures...and wanting time to experiment more! Thanks!
Char.
These features that you do are so incredibly informative. I've starred them all to refer to when I have some time to sit and really absorb what I'm reading. You are great! :)
ReplyDeletethis stuff is sooooo cool!
ReplyDeleteLove this Cindy. I just bought the book Nikon D90 for dummies,and between your tutorials and that book, I think I may be brave enough to switch the dial to M soon :)
ReplyDelete